

Leveling up by taking performance improvement measures for our super friendly NgDocker app. In this article, we will explore how we can enable Gzip to improve performance at a hulking scale.
This article is sort of continuation of the previous article Dockerized Angular App with Nginx - NgDocker with some added features and modules. The idea is to enable the Gzip compression at Nginx configuration in order to make application loading blazingly fast. The Gzip compression is must for any SPA/API developed on server in order to reduce the data transmission up to 80%. It is important to understand how to enable and control the configurations related to Gzip to make any SPA based application stand out. For this we are creating an Angular application on the same base line of NgDocker app, this will be Mark 2 of NgDocker app.
We will head in this direction:
Let us first do the daily chores of any Angular app and as per the need of the hour we are considering v15 of Angular; just for fun we are using Cirrus UI:
ng new ng-docker-mark-2

npm i cirrus-ui
Below shows the skeleton of the project:
ng-docker-mark-2
|-- nginx
|   |-- nginx.conf
|-- src
|   |-- app
|   |   |-- core
|   |   |   |-- components
|   |   |   |   |-- footer
|   |   |   |   |-- header
|   |   |   |-- pages
|   |   |   |   |-- home
|   |   |   |-- services
|   |   |       |-- core.service.ts
|   |   |       |-- products.service.ts
|   |   |-- modules
|   |   |   |-- posts
|   |   |   |-- users
|   |   |-- app-routing.module.ts
|   |   |-- app.component.html
|   |   |-- app.component.ts
|   |   |-- app.module.ts
|-- angular.json
|-- Dockerfile
|-- package.json
This application respect minimalism and have less number of routes and components. For the sake of understanding how compression affects the lazy loaded modules we have added 2 feature standalone modules Posts and Users. Thanks to Angular v15 these are standalone components routed in a lazy loaded fashion. The data is coming from our beloved JSON Placeholder API.
Below shows the business logic for Posts component, the Users component is also created in the similar manner:
posts.component.html
<div class="section">
  <div class="content">
    <div class="row mb-3" *ngFor="let post of posts$ | async">
      <div class="col-sm-4">
        <img
          class="img-stretch u-round-md"
          [src]="getImage(post)"
          alt="img-stretch"
          height="400"
          (error)="getDefaultImage($event)" />
      </div>
      <div class="col-lg-6 col-md-8">
        <h3>{{ post.title | titlecase }}</h3>
        <p>{{ post.body }}</p>
        <div>
          <span class="icon">
            <i class="far fa-wrapper fa-clock" aria-hidden="true"></i>
          </span>
          {{randomDate | date: 'fullDate'}}
        </div>
      </div>
    </div>
  </div>
</div>
posts.component.ts
posts$?: Observable;

constructor(private coreService: CoreService) {
  this.posts$ = coreService.getPosts();
}
Below shows the post service, the user service is also created in similar manner:
products.service.ts
private url: string = environment.apiUrl;

constructor(private http: HttpClient) {}

get(name: string) {
  const url = `${this.url}${name}`;
  return this.http.get(url);
}
Below shows the routes of the application:
app-routing.module.ts
const routes: Routes = [
  { path: '', component: HomeComponent },
  { path: 'posts', loadComponent: () => import('./modules/posts/posts.component').then(x => x.PostsComponent) },
  { path: 'users', loadComponent: () => import('./modules/users/users.component').then(x => x.UsersComponent) },
  { path: '**', component: HomeComponent },
];The time has come to enable Gzip in Nginx configuration file which we have seen in the previous article for re-writing the route for SPA:
server {
    gzip            on;
    gzip_static     on;
    gzip_types      text/plain text/css application/json application/javascript text/xml application/xml application/xml+rss text/javascript;
    gzip_proxied    no-cache no-store private expired auth;
    gzip_min_length 1000;
    ...
}
That's it, no need to check or look anywhere else, this much is required for speeding up your app performance! Also, these settings are self explanatory, the first 2 lines enables the Gzip and Gzip for static files, followed by mentioning of types for which the Gzip will be enabled (note: no need to compress already compressed images like JPG), then we are keeping the gzip_proxied to the default setting and then finally setting the min length for Gzip consideration, right now we have gone with 1000 means 1KB, files below 1KB won't be compressed then, we can make it 256 too optionally to consider even smaller than 1KB file.
For this we require to have Docker Desktop, otherwise we are unworthy to proceed.
Build Docker Image
# build image
docker build -t ng-docker:mark-2 .
Run Docker Container
# run container
docker run -p 3300:80 --name ng-docker-mark-2-container-1 ng-docker:mark-2
Here, you can change to your favorite port, we are going with "3300" for a change. Once, executed then open `http://localhost:3300/` to run the application.
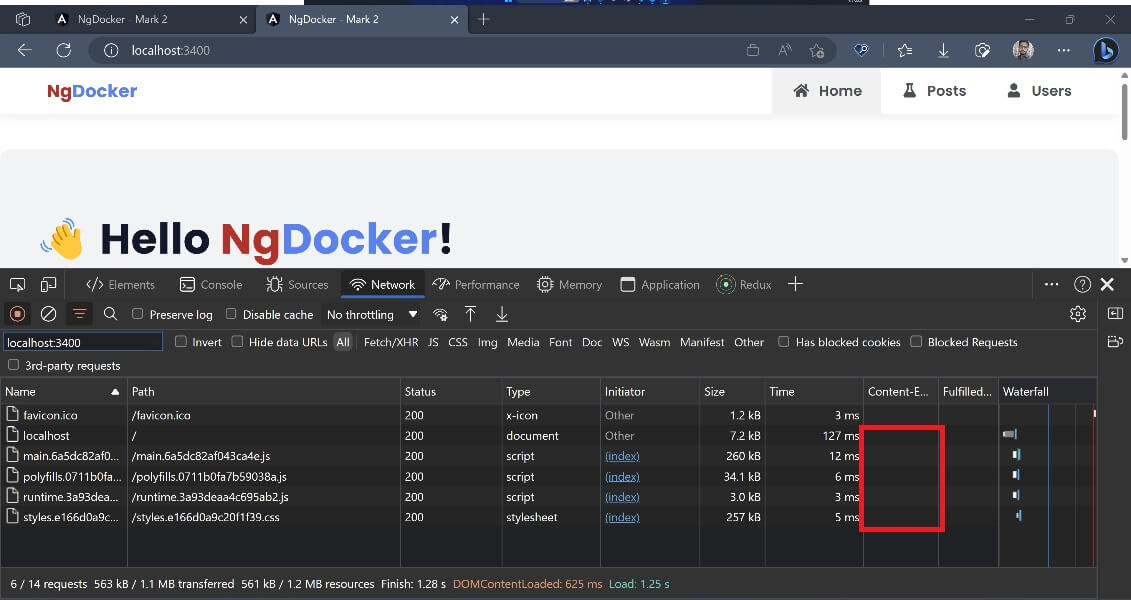
Its time for the celebration! Due to drastic improvement in the performance. Here, we will compare the time to load files with and without Gzip through below screen shots:
Gzip Disabled (before)
Gzip Enabled (after)
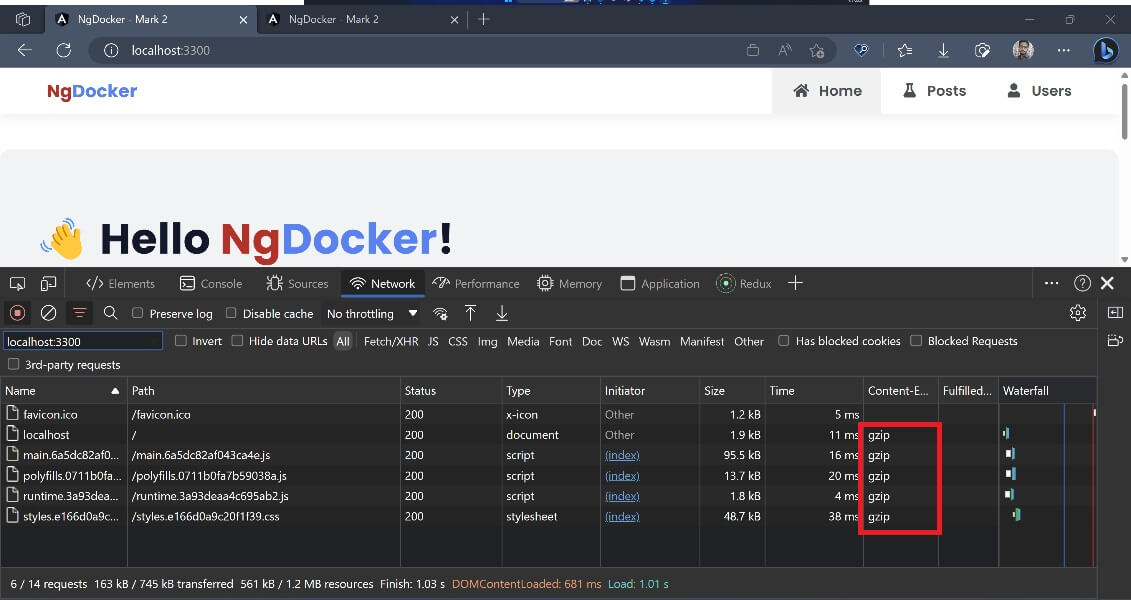
Here, we can clearly see the before and after effect on the file size, the biggest file (main.js) early which was around 256KB turns out to be of 95.5KB of size after enabling the Gzip. The snowball effect can clearly be seen in other files too. The "Content-Encoding" header usually doesn't appear in the browser's Network tab of Developer Tools, we can add it by simply right clicking on the table of Network tab and go to "Headers" option and then add the "Content-Encoding".
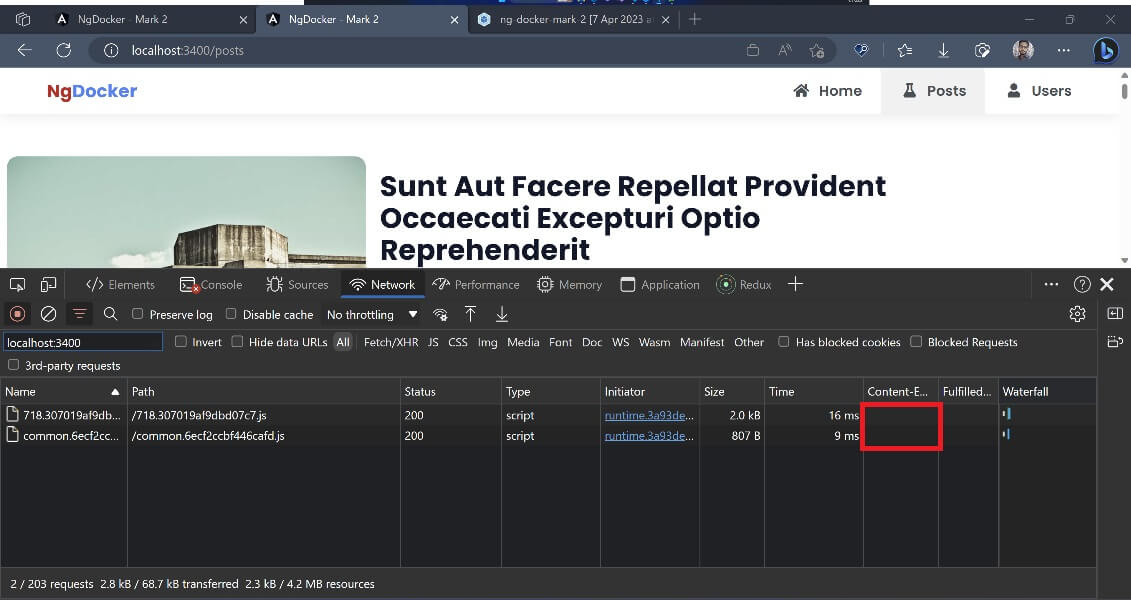
Similar effect can also be observed with lazy-loaded modules:
Lazy Loaded Module - Gzip Disabled (before)
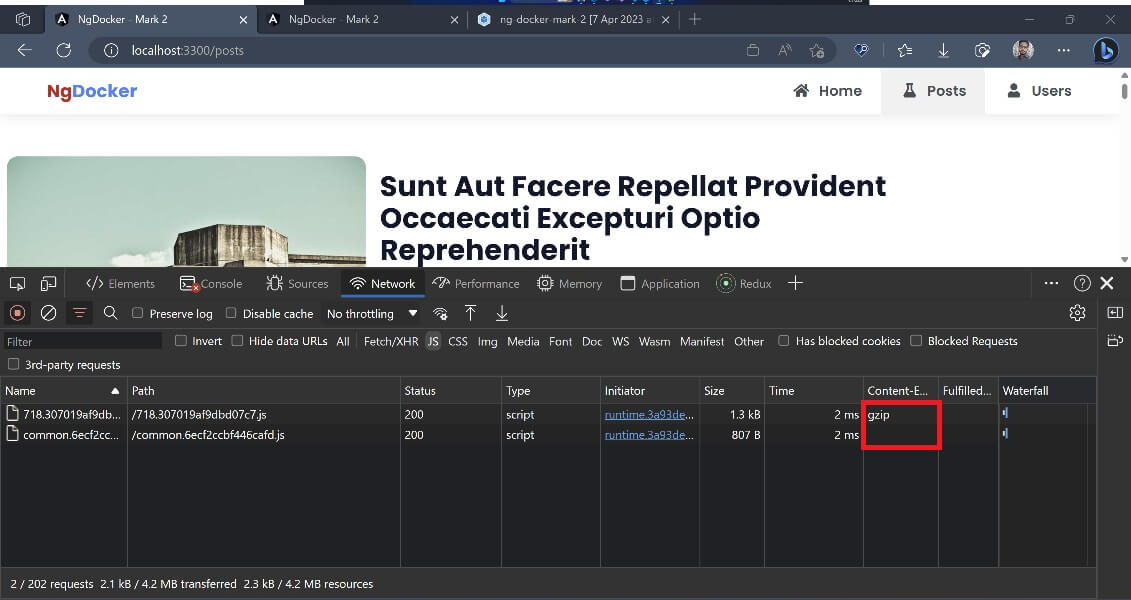
Lazy Loaded Module - Gzip Enabled (after)
We can analyze our modules and bundle size in a more better way with the help of Web Pack Bundle Analyzer. This package helps to provide a breakdown of the entire Angular project and the size of the bundle in Stats, Parsed and Gzipped state. The Stats is the default build without production, the Parsed is the production build with minified JS and CSS and finally the Gzipped state is the production build with Gzip enabled. This will give a very clear and early picture of your project, how much it has grown, which modules are heavier, how to keep main.js minimal as much as we can. With the decision making becomes very easy peasy.
We first have to install the Web Pack Bundle Analyzer, make sure to add it as Dev Dependency, since it just a tool to analyze the project bundle:
npm i webpack-bundle-analyzer -DAdd scripts to package.json file:
"scripts": {
  "build:prod-stats": "ng build --configuration production --stats-json",
  "analyze": "npm run build:prod-stats && webpack-bundle-analyzer dist/ng-docker-mark-2/stats.json",
}
Here, we are adding one new "build:prod-stats" production build command with "stats-json" flag, this will create "stats.json" file once the build is completed. This file is then used by the next command of Web Pack Bundle Analyzer. The script "analyze" clubbed the build stats and analyzer commands.
Run Web Pack Bundle Analyzer:
npm run analyzeThis will open a web page to show the project bundle graph as follows:
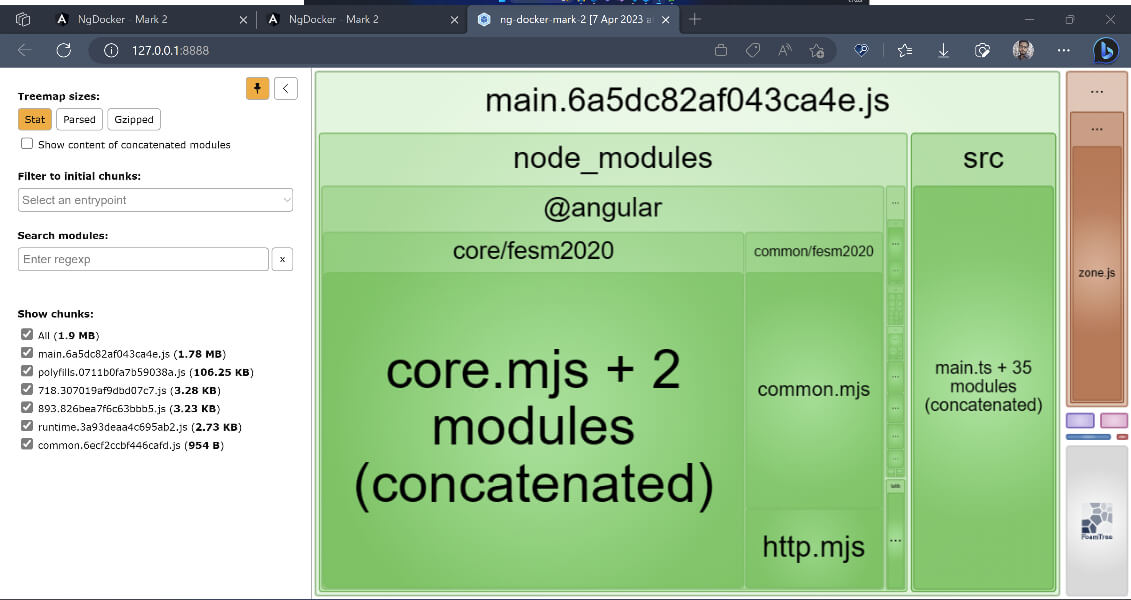
Here, we can see the entire project and its module and the feature modules with their respective sizes. If you notice the left side bar it shows the 3 states that we have discussed earlier.
This will open a web page to show the project bundle graph as follows:
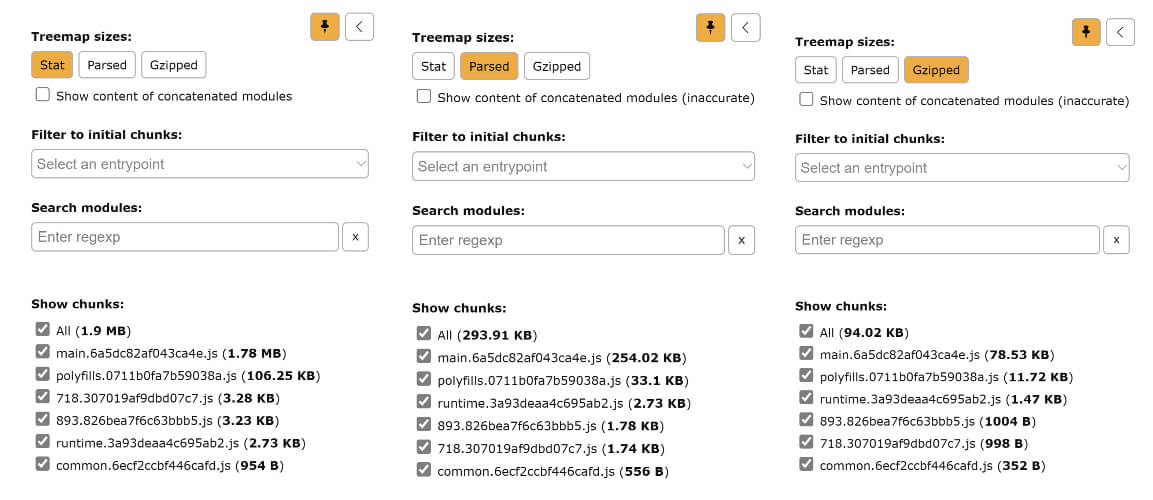
Here, we can see the 3 states, and finally the Gzipped version of the JS files. If we notice the sizes its not fully accurate what we finally got on the application while running it, like the main.js Parsed is 254KB and while the actual is 256KB and the Gzipped is 78.53KB while we got 95.5KB; so, its not pixel perfect but at least on a closer proximity.


December 31, 2020

October 19, 2020

March 02, 2022
CodeOmelet is perfect for code hunger; its a coding blog containing articles and solutions related to web, mobile, cloud, console, desktop applications for the developers.

October 11, 2025

October 11, 2025
 .NET C#
 Azure
Azure
 JavaScript
 JEST
JEST
 NodeJS
 React
React